
To identify failing mortar joints, look for hairline fractures, widening gaps, and discoloration in your masonry. Check for moisture intrusion, like dark spots or powdery textures. Use chisels to test for loose mortar and moisture meters to detect dampness. Regular inspections are key, especially after weather changes that could affect integrity. Don’t ignore these signs; neglected issues can lead to costly repairs down the line. There’s more to know about prevention and repair options.
Key Takeaways
- Conduct regular visual inspections for hairline fractures, discoloration, and crumbling mortar to identify early signs of failure.
- Look for moisture intrusion indicators like dark spots and powdery textures that suggest water infiltration issues.
- Use chisels to check for loose mortar and moisture meters to assess dampness in joints.
- Monitor specific joint types, including horizontal, vertical, and expansion joints, for signs of deterioration.
- Address any detected issues promptly with repairs like repointing or sealing to prevent long-term damage.
Common Causes of Mortar Joint Failure
When mortar joints fail, it often stems from a few common causes that you should be aware of. One major factor is the composition of the mortar itself. A poor mortar composition analysis can lead to weakness, making joints susceptible to cracking. Using low-quality materials or incorrect ratios can compromise strength and durability.
Another critical cause is environmental impact. Changes in temperature, moisture levels, and exposure to harsh weather can deteriorate mortar over time. For instance, freeze-thaw cycles can expand and contract the mortar, leading to potential failure.
Additionally, structural movement, whether from settling or shifting, can stress the joints. Ignoring these issues can escalate damage and lead to costly repairs.
How to Spot Cracks in Mortar Joints
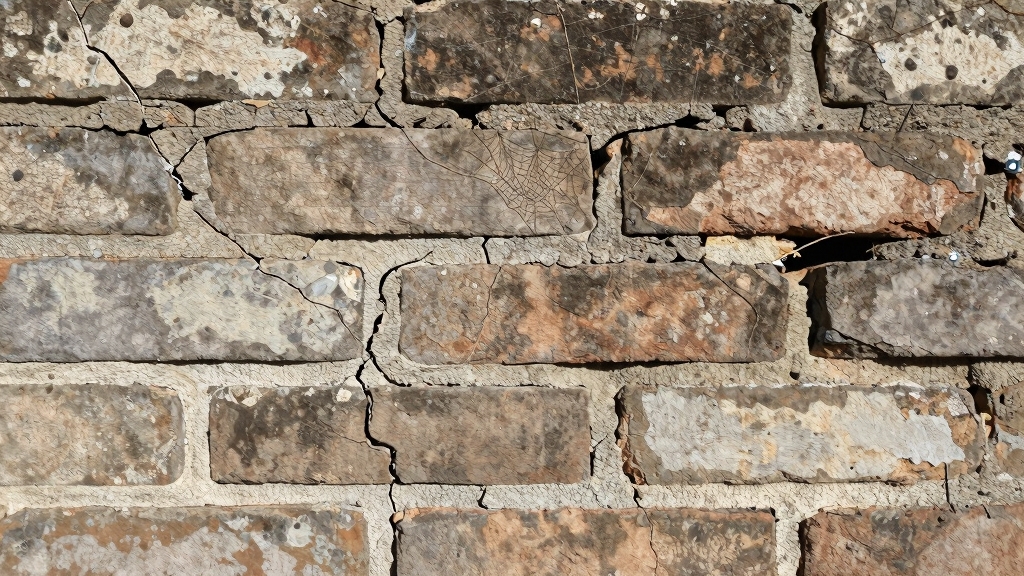
To spot cracks in mortar joints, start with a thorough visual inspection of your walls.
Look for common crack types, such as hairline fractures or wider gaps, which can indicate issues.
Knowing what to look for will help you catch potential problems early.
Visual Inspection Techniques
While you might think mortar joints are sturdy, cracks can appear unexpectedly, signaling potential issues.
To carry out an effective visual assessment, start by closely inspecting the joints for any signs of wear or damage. Look for uneven surfaces, discoloration, or gaps between bricks.
A thorough joint evaluation requires you to examine various angles and lighting conditions, as shadows can highlight subtle cracks. Use a flashlight to illuminate hard-to-see areas, making it easier to spot problems.
Don’t rush; take your time to guarantee you catch even the smallest defects. Regular visual inspections will help you maintain the integrity of your structure and address any issues before they escalate.
Common Crack Types
After completing a visual inspection of mortar joints, it’s important to recognize the different types of cracks that can signal underlying issues.
Pay attention to crack width—narrow cracks, less than 1/8 inch, might be cosmetic but still require monitoring. However, wider cracks, especially those exceeding 1/4 inch, often indicate serious structural problems and demand immediate repair urgency.
Horizontal cracks suggest pressure from settling, while vertical cracks may stem from natural shrinkage. Diagonal cracks can indicate a combination of issues, such as settling or excessive moisture.
How to Prevent Crumbling and Erosion in Mortar Joints
To keep your mortar joints strong, you need to focus on regular maintenance and select quality materials.
Proper installation techniques also play an essential role in preventing crumbling and erosion.
Regular Maintenance Practices
Maintaining mortar joints is essential for preventing crumbling and erosion, especially since neglect can lead to costly repairs down the line. You should prioritize routine check-ups and seasonal inspections to catch any issues early. Here’s a simple guide to help you stay on track:
| Maintenance Task | Frequency |
| Inspect mortar joints | Every 6 months |
| Clean debris | Quarterly |
| Repoint as needed | Annually |
Quality Material Selection
Choosing the right materials is essential if you want to prevent crumbling and erosion in your mortar joints. Here are some key considerations:
- Conduct Mortar Durability Testing: Test your materials to verify they can withstand environmental conditions.
- Opt for Quality Ingredients: Use high-grade sand, cement, and additives to enhance longevity.
- Implement Material Sourcing Strategies: Source your materials from reputable suppliers to guarantee consistency and reliability.
- Match Mortar to Brick Type: Confirm your mortar composition aligns with the type of brick or stone to allow for proper expansion and contraction.
Proper Installation Techniques
Even with quality materials, improper installation can lead to crumbling and erosion in mortar joints. To guarantee longevity, focus on effective mortar application techniques.
Start by mixing the mortar to the right consistency; too dry or too wet can weaken the bond. When applying mortar, use a trowel to fill joints completely, avoiding air pockets that trap moisture.
Once applied, don’t overlook joint curing methods. Allow the mortar to cure properly by keeping it moist for at least 48 hours, which helps strengthen the joint.
Protect your work from extreme temperatures during this period, as rapid drying can cause cracks. By mastering these techniques, you can greatly reduce the risk of mortar joint failure and extend the life of your masonry work.
The Impact of Weather on Mortar Integrity
While it’s easy to overlook, weather plays an essential role in the integrity of mortar joints. Changes in weather patterns and seasonal shifts can greatly affect your mortar’s lifespan. Here’s how:
- Temperature Fluctuations: Extreme heat and cold can cause thermal expansion and contraction, stressing the mortar.
- Moisture Levels: High humidity and rain impact the mortar’s curing process, weakening its structure.
- Freeze-Thaw Cycles: In colder climates, moisture trapped in the joints can freeze and expand, leading to cracks.
- UV Exposure and Wind Erosion: Prolonged sunlight can degrade the mortar’s surface, while wind erosion can accelerate wear.
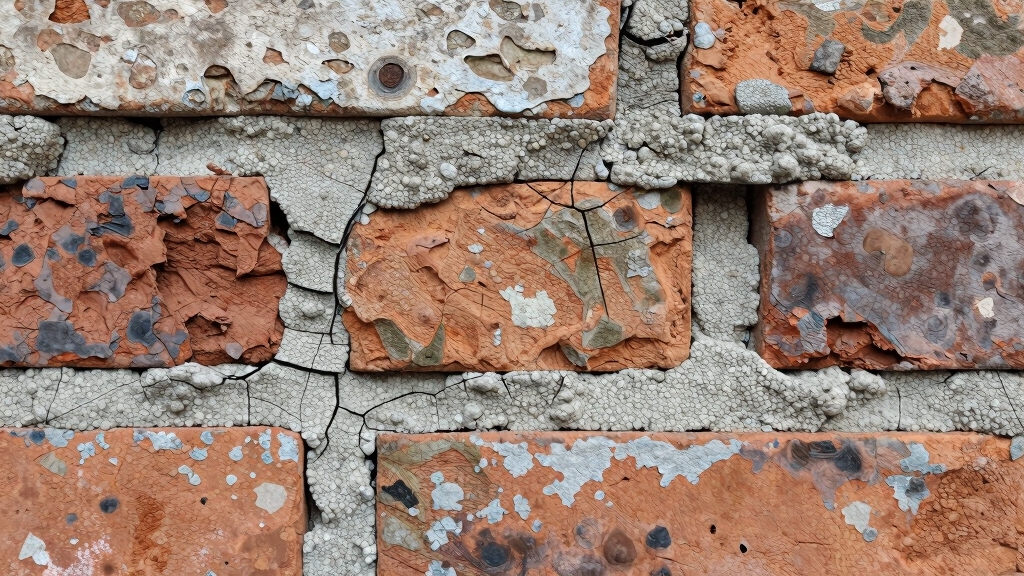
Identifying Discoloration in Mortar Joints
As you inspect your mortar joints, discoloration can be a clear indicator of underlying issues. Pay close attention to any noticeable mortar color changes, as they often signal moisture problems or deterioration. Common discolorations include dark spots or fading, which can suggest mold growth or water infiltration.
To effectively assess the situation, perform a joint texture analysis. Run your fingers along the joints; if they feel crumbly or powdery, it’s a sign that the mortar isn’t holding up as it should. This degradation can lead to further damage if not addressed promptly.
If you notice significant discoloration, it’s crucial to investigate further. Look for signs of water damage or structural compromise. Early detection can help you take the necessary steps to preserve your masonry and prevent costly repairs down the line.
Keeping an eye on these changes will help guarantee the longevity of your mortar joints.
Why You Should Check for Loose Bricks or Stones
Checking for loose bricks or stones is essential to maintaining your structure’s integrity.
If you ignore these signs, you might face serious consequences, like water damage or structural failure.
Signs of Loose Bricks
Have you noticed any gaps or cracks in your brickwork? These could be signs of loose bricks, which can compromise your brick stability and overall structural integrity.
It’s crucial to recognize these signs early. Here are a few indicators to check for:
- Visible gaps between bricks or stones.
- Cracks in the mortar lines that seem to widen over time.
- Movement or a noticeable shift when you push on the bricks.
- Sound of hollow spaces behind bricks when tapped.
If you observe any of these signs, it’s time to investigate further.
Addressing loose bricks promptly can prevent more severe issues down the road and guarantee your structure remains safe and sound.
Consequences of Ignoring Issues
Ignoring signs of loose bricks or stones can lead to serious consequences for your home. When these issues go unaddressed, the structural integrity of your property is compromised.
Over time, water can seep into cracks, causing further damage and potentially leading to costly repairs. You might think a small problem isn’t urgent, but it can escalate quickly. The longer you wait, the higher the repair costs can skyrocket.
What starts as minor maintenance can evolve into significant structural renovations. By checking for loose bricks or stones regularly, you can catch issues early and save yourself from financial strain.
Addressing these problems promptly guarantees your home remains safe and sound, protecting both your investment and peace of mind.
Maintenance Tips for Longevity
While it may seem tedious, regularly inspecting your mortar joints for loose bricks or stones can save you a lot of trouble down the line.
Ensuring mortar joint longevity requires effective maintenance. Here are some tips to help you stay on top of things:
- Visual Inspection: Check for any visible gaps or cracks in the mortar.
- Tap Test: Gently tap bricks or stones; listen for hollow sounds indicating loose sections.
- Check for Moisture: Look for signs of water damage, which can weaken joints.
- Schedule Regular Repairs: Don’t wait until problems escalate; address minor issues promptly.
Key Joint Types to Monitor
To effectively maintain your structure, it’s essential to monitor specific joint types that are prone to failure. Start by keeping an eye on horizontal joints, as they bear the weight of structures above and can crack under pressure.
Next, focus on vertical joints, which are often susceptible to moisture infiltration, leading to deterioration over time. Don’t overlook expansion joints; they allow for movement but can fail if not properly maintained.
Focus on vertical joints to prevent moisture infiltration, and ensure expansion joints are well-maintained to avoid failure.
Using effective monitoring techniques, such as visual inspections and regular maintenance checks, can help you catch issues early. Pay attention to any signs of crumbling, discoloration, or gaps in the mortar.
You should also consider seasonal changes, as temperature fluctuations can affect joint integrity. By being proactive and monitoring these key joint types, you’ll help guarantee the longevity of your structure and prevent costly repairs down the line.
How to Assess the Overall Condition of Your Walls
Regularly evaluating the overall condition of your walls is essential for maintaining structural integrity. By examining your walls, you can ascertain their stability and prevent costly repairs down the line.
Here’s how to effectively assess your walls:
- Visual Inspection: Look for cracks, discoloration, or bulging. These can indicate underlying issues.
- Check for Moisture: Use a moisture meter to detect dampness. Excess moisture can compromise wall stability.
- Listen for Sounds: Tap on the walls. Hollow sounds may suggest delamination or other structural problems.
- Examine Seals and Joints: Inspect mortar joints and seals. Failing joints can lead to water intrusion and further damage.
Identifying Water Damage in Your Mortar Joints
Identifying water damage in your mortar joints is essential for maintaining the integrity of your walls. Start by looking for visible signs like discoloration or efflorescence, which often indicate moisture issues.
Pay attention to damp spots, especially after heavy rain, as they can signal moisture intrusion detection.
Next, consider performing a water source identification. Check gutters, downspouts, and drainage systems to verify they’re directing water away from your home.
Inspect the mortar joints closely; crumbling or cracking can also point to water damage.
Don’t forget to pay attention to the interior of your walls. Water stains or peeling paint can signal that moisture is making its way through.
If you suspect significant damage, it might be best to consult a professional to assess the situation and recommend repairs.
Addressing these issues early can save you from more extensive damage down the line.
How Expansion and Contraction Affect Mortar
As temperatures fluctuate, the expansion and contraction of mortar can lead to significant structural issues. Understanding how thermal expansion and seasonal contraction affect your mortar joints is essential for maintaining your property.
As temperatures fluctuate, mortar’s expansion and contraction can create serious structural challenges for your property.
Here are some key points to reflect on:
- Cracking: Repeated expansion and contraction can cause cracks, allowing moisture to seep in.
- Spalling: This occurs when the outer layer of mortar flakes off due to temperature changes.
- Loosening: Over time, mortar may lose its bond with bricks or stones, weakening the structure.
- Water Infiltration: Cracks can lead to water damage, promoting further deterioration.
Using a Moisture Meter?
When it comes to identifying failing mortar joints, detecting moisture is essential.
Using a moisture meter can help you get accurate readings, guiding your repair decisions.
Let’s explore the best techniques to guarantee you’re using your meter effectively.
Importance of Moisture Detection
Moisture detection plays an essential role in maintaining the integrity of mortar joints, especially since undetected moisture can lead to significant structural issues.
Proper moisture assessment is vital to guarantee your building remains sound. Here are four reasons why you should prioritize damp detection:
- Prevents Damage: Unchecked moisture can weaken mortar, leading to cracks and deterioration.
- Improves Longevity: Early detection helps extend the lifespan of your structure.
- Enhances Health: Reducing moisture limits mold growth, promoting a healthier environment.
- Saves Costs: Identifying moisture issues early can save you from expensive repairs down the line.
Using a moisture meter effectively aids in these assessments, allowing you to address problems before they escalate.
Techniques for Accurate Readings
To achieve accurate readings with a moisture meter, you need to guarantee proper technique and positioning. Begin by ensuring the meter’s probes make full contact with the mortar joint. Hold the device steady for a few seconds to allow for ideal moisture analysis. It’s also essential to test multiple areas to get a reliable average—don’t rely on a single reading.
| Mortar Condition | Recommended Action |
| Dry | No immediate action |
| Slightly Moist | Monitor regularly |
| Wet | Investigate further |
| Crumbling | Immediate repair needed |
These steps in mortar testing will help you identify failing joints early, preventing costly repairs down the line. Your proactive approach today can save you time and stress tomorrow.
The Importance of Regular Inspections
Regular inspections are essential for maintaining the integrity of your mortar joints. By checking them regularly, you can catch potential issues early and avoid costly repairs.
Here’s a simple inspection checklist to guide you:
- Check for Cracks: Look for visible cracks or gaps in the mortar.
- Inspect Color Changes: Discoloration can indicate moisture issues or deterioration.
- Assess the Surface: Verify the surface feels solid and isn’t crumbling or flaking.
- Evaluate Joint Width: Measure the width of the joints; they should be consistent and within standard limits.
Aim for an inspection frequency of at least twice a year. This proactive approach helps you identify any signs of failing joints before they escalate.
Regular inspections not only protect your investment but also enhance your home’s aesthetic appeal.
Stay vigilant, and your mortar joints will remain strong and durable for years to come.
What to Do When You Find Failing Joints?
When you spot failing mortar joints, it’s essential to act quickly to prevent further damage.
You’ve got several repair options to evaluate, along with effective prevention strategies to keep your structure safe.
Let’s explore what steps you can take to address these issues effectively.
Repair Options Available
Identifying failing mortar joints can be challenging, but there are effective repair options available to restore your structure’s integrity.
Here are some common repair methods you can consider:
- Repointing: This involves removing damaged mortar and replacing it with fresh material, ensuring a strong bond.
- Joint Sealing: Use a high-quality sealant to fill in small cracks and gaps, preventing water intrusion.
- Epoxy Injection: For more severe cases, you can inject epoxy into cracks to provide structural reinforcement.
- Full Replacement: In extreme situations, replacing entire sections of masonry may be necessary for lasting stability.
Prevention Strategies To Consider
Failing mortar joints can lead to significant structural issues if not addressed promptly. To guarantee your mortar joints maintain their integrity, consider these prevention strategies:
| Strategy | Benefits |
| Regular Inspections | Catch issues early |
| Effective Sealing | Protects against moisture |
| Quality Materials | Enhances mortar joint longevity |
| Seasonal Maintenance | Prevents weather damage |
Temporary Fixes for Minor Issues
While minor issues with mortar joints might seem insignificant, addressing them promptly can prevent more extensive damage down the line.
Here are some quick fixes you can implement:
- Temporary Patching: Use flexible materials to fill small cracks, providing a short-term solution.
- Sealant Application: Apply a high-quality sealant over minor gaps to protect against moisture.
- Joint Sealing: Utilize caulking methods to seal joints, ensuring water doesn’t seep in and cause further deterioration.
- Epoxy Injection: For deeper cracks, consider epoxy injection, which can strengthen the joint while providing a durable surface repair.
These quick fixes can help maintain the integrity of your mortar joints until you’re ready for a more permanent solution.
Regular checks and maintenance will keep your structure safe and sound!
When to Call a Professional Mason?
If you notice significant damage to your mortar joints or if minor issues persist despite your best efforts, it’s time to call a professional mason. Ignoring these signs can lead to more extensive damage, which could be costly. A professional can assess the situation accurately, providing a thorough masonry consultation to identify underlying problems.
When you see cracks, crumbling, or gaps in the mortar, don’t hesitate. These are indicators that more than just a quick fix is needed. A skilled mason has the expertise to perform proper mortar repair, ensuring that your structure remains stable and secure.
Additionally, if you’re unsure about the severity of the damage or the best approach, seeking professional help is always a smart move. They’ll guide you through the repair process, giving you peace of mind and saving you from potential future headaches.
The Long-Term Effects of Ignoring Mortar Problems
Ignoring mortar problems can lead to serious consequences that affect not just the appearance of your property, but also its structural integrity.
Over time, you could face several long-term risks, including:
Over time, neglecting mortar issues can lead to serious long-term risks for your property’s safety and value.
- Water Damage: Cracked mortar allows moisture to seep in, promoting mold and rot.
- Pest Infestation: Gaps in mortar can invite insects and rodents into your home.
- Foundation Issues: Weakened mortar can compromise the entire structure, leading to costly repairs.
- Aesthetic Decline: Unsightly mortar joints can detract from your property’s curb appeal, lowering its value.
Addressing mortar issues promptly helps maintain your home’s durability and safety.
By staying proactive, you can prevent these long-term risks and guarantee your property remains in good condition for years to come.
Don’t wait until it’s too late—regular maintenance is key!
Essential Tools for Assessing Mortar Integrity
To effectively assess mortar integrity, you’ll need a few essential tools that make the job easier and more accurate. Start with joint inspection tools like a chisel and hammer to check for loose or crumbling mortar. A moisture meter helps identify hidden moisture issues that can weaken the mortar. Finally, consider using a boroscope for deeper inspections inside joints.
Here’s a quick overview of these tools:
| Tool | Purpose | Mortar Testing Methods |
| Chisel and Hammer | Check for loose mortar | Visual inspection |
| Moisture Meter | Detect hidden moisture | Moisture testing |
| Boroscope | Inspect deep within joints | Internal condition check |
Essential Tips for Maintaining Your Mortar Joints
While maintaining your mortar joints may seem challenging, regular care can greatly extend their lifespan and prevent costly repairs. Here are some essential tips to keep your mortar joints in top shape:
Regular maintenance of your mortar joints can significantly enhance their durability and avert expensive repairs.
- Choose the Right Mortar Type: Verify you’re using a mortar type suitable for your specific climate and building materials.
- Inspect Regularly: Check for cracks or crumbling at least twice a year. Early detection can save you headaches later.
- Clean Joints: Remove dirt and debris from your joint profiles to prevent moisture buildup, which can lead to deterioration.
- Sealant Application: Consider applying a sealant to help protect your mortar joints from water infiltration and freeze-thaw cycles.
The Benefits of Preventative Maintenance
Regular maintenance not only keeps your mortar joints in good shape but also offers significant long-term benefits. By implementing preventative measures, you can catch small issues before they escalate into costly repairs.
Regular inspections allow you to identify signs of wear and tear early, saving you time and money down the line.
Establishing maintenance schedules guarantees that you’re consistently checking the condition of your mortar joints. This proactive approach helps maintain the structural integrity of your building, preventing water damage and mold growth that can arise from neglected joints.
Plus, a well-maintained structure enhances your property’s curb appeal and value.
Investing a little time in preventative maintenance now can spare you from major headaches later. It’s all about being proactive rather than reactive.
Frequently Asked Questions
How Often Should I Inspect My Mortar Joints?
You should conduct a mortar joint inspection at least once a year. However, if you notice any cracks or water damage, increase the frequency guidelines to every six months for proactive maintenance and longevity.
Can I Repair Mortar Joints Myself?
Yes, you can repair mortar joints yourself! With the right DIY tools and materials, like a chisel and mortar mix, you’ll tackle the project effectively. Just follow proper techniques for a solid, lasting repair.
What Types of Mortar Are Best for Repairs?
For repairs, use Type S or Type N mortar; they’re strong and flexible. Employ proper repair techniques like tuckpointing or repointing. These mortar types guarantee durability, blending well with existing structures for a seamless finish.
How Do I Choose a Professional Mason?
To choose a professional mason, check their masonry qualifications and ask for contractor references. Interview potential candidates to guarantee they understand your needs, and review their past work to gauge their expertise and reliability.
Are There Specific Signs of Structural Damage Related to Mortar Failure?
Yes, look for cracking patterns in the mortar, which can indicate structural issues. You might also notice water intrusion, leading to further damage. Address these signs early to prevent more serious problems down the line.
Final Thoughts
Failing mortar joints rarely fix themselves, and the sooner you spot problems like cracking, gaps, discoloration, or moisture intrusion, the easier it is to prevent bigger masonry repairs. Regular inspections and prompt maintenance are the best way to protect your brickwork from water damage, structural shifting, and accelerated deterioration.
If you’re seeing warning signs and want a clear, professional assessment, PREMIERE MASONRY ROCHESTER HILLS can help. Our team specializes in restoring mortar joints the right way through precision tuckpointing and complete masonry restoration when needed. Visit our Services page to learn more, then contact us to schedule an inspection and protect your masonry before minor joint failure turns into major damage.