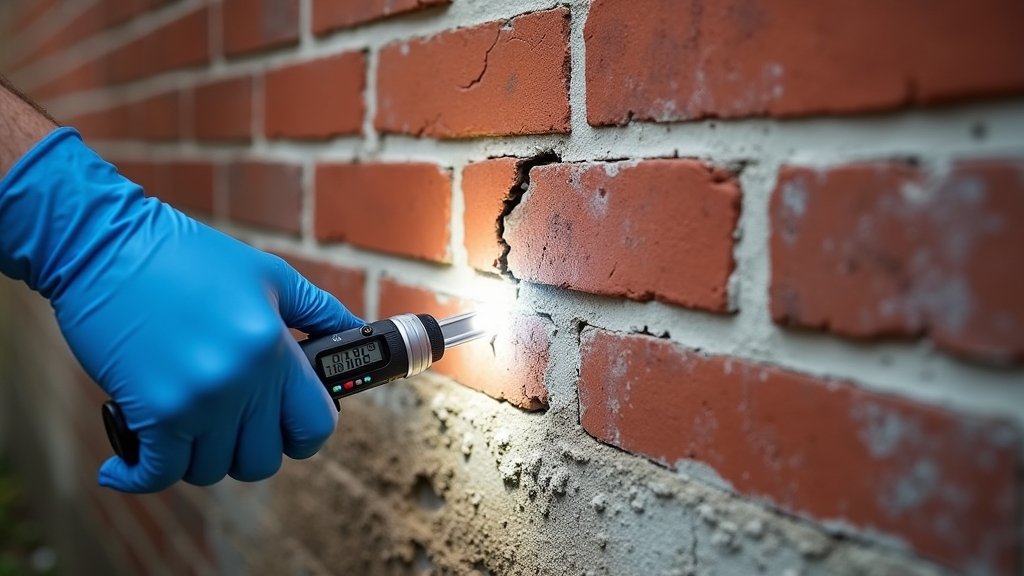
Wear gloves, eye protection, and sturdy shoes, then scan exterior walls, chimneys, and foundations with a bright flashlight. Look for hairline to 1/8-inch cracks, bulges, loose mortar, spalling faces, and white efflorescence. Check grading, gutters, and downspouts to confirm water sheds away. Inside, note damp spots, musty odors, peeling paint, sticking doors, and salt deposits. Document photos, measure crack widths, and recheck seasonally. Fix drainage first, then repoint and seal. Call a pro if instability appears—there’s more you can do next.
Key Takeaways
- Walk the exterior and interior with a flashlight, noting cracks, damp patches, efflorescence, spalling, and areas near openings, sills, chimneys, and grade lines.
- Measure and document cracks: note width, displacement, start/end points; monitor changes seasonally, and call a pro if cracks exceed 1/8 inch.
- Probe mortar joints and brick faces for softness, flaking, or hollow sounds; check for offset bricks indicating settlement or lateral pressure.
- Trace water paths: verify gutters, downspouts, and grading direct runoff away; inspect flashing, penetrations, and joints for gaps or leaks.
- Prioritize safety and stability: wear PPE, look for bulging or loose units, control hazards, and stop if instability is detected.
Why Early Detection of Masonry Damage Matters
Even small cracks and loose mortar can signal bigger problems, so catching masonry damage early protects your structure and your wallet.
When you spot issues sooner, you prevent water intrusion, freeze-thaw expansion, and shifting that widen gaps and weaken walls. Early detection lets you plan preventive measures—like sealing joints or repointing—before repairs become invasive and expensive.
You also reduce safety risks. Unchecked damage can lead to loose bricks, leaning chimneys, and failing lintels. By acting quickly, you preserve structural integrity and maintain property value.
Routine observation delivers long term benefits: fewer emergencies, predictable maintenance costs, and better energy performance because tight masonry resists drafts and moisture.
Think of early detection as risk management—small fixes now avoid major reconstruction later and keep your building durable.
Basic Tools to Bring to Your Inspection

You’ll need a few essential hand tools—like a flashlight, tape measure, level, mason’s hammer, and a stiff brush—to check surfaces and joints accurately.
Don’t forget safety gear: gloves, eye protection, sturdy shoes, and a dust mask when mortar or efflorescence is present.
Bring reliable lighting—a bright LED flashlight and, if possible, a headlamp—to illuminate cracks, gaps, and shadowed areas.
Essential Hand Tools
Before you step onto a site, pack a lean kit of essentials so you can assess masonry quickly and safely.
For masonry inspection, carry a stiff putty knife and a thin probe or feeler gauges to test mortar joints and measure gap widths during crack evaluation.
Add a 6–12 inch ruler and a tape measure for dimension checks, plus a small level and a straightedge to spot bulges or out-of-plane movement.
Bring a quality magnifier or loupe to examine hairline fractures and surface scaling.
A chalk stick or wax pencil lets you mark crack ends and note locations.
Include a clipboard with graph paper for quick sketches, and zip bags to collect efflorescence or mortar samples for later reference.
Safety and Lighting
While masonry looks static, inspection sites change underfoot, so build safety and lighting into your kit from the start.
Wear safety gear: hard hat, cut‑resistant gloves, and ANSI‑rated safety glasses. Add a high‑visibility vest so others see you near vehicles or lifts. Use steel‑toe boots with good tread for loose aggregates and wet surfaces.
Control lighting conditions. Pack a headlamp for hands‑free closeups and a powerful flashlight (with spare batteries) to sweep walls, joints, and cavities.
A compact work light with a magnetic base helps when you need steady illumination. Carry a small mirror to bounce light behind pipes, and colored chalk to mark defects you’ll revisit.
Include hearing protection for power tools nearby and a dust mask or respirator if mortar or efflorescence becomes airborne.
Safety Precautions Before You Begin

Start with three essentials: protect yourself, control the environment, and verify stability.
Put on personal protective gear: safety glasses, gloves, long sleeves, and sturdy shoes with good traction. If dust or spores are likely, use a respirator rated N95 or better.
Create an equipment checklist so you don’t improvise: flashlight, moisture meter, camera, notepad, straightedge, ladder with non-slip feet, and a first-aid kit.
Control the environment before you approach the work area. Turn off nearby utilities if lines or fixtures are exposed. Keep children and pets away. Set cones or tape to mark off fall and trip hazards, and clear loose debris.
Verify stability: look for bulging walls, loose stones, or spalling that could fall. If anything seems unstable, step back and call a professional.
Exterior Areas to Check First
Start outside, where problems often show first.
Check the foundation and grade for cracks, bulges, and drainage that pushes water toward the walls.
Then assess chimneys and caps for loose mortar, damaged flashing, and gaps that invite moisture.
Foundation and Grade
First, walk the exterior where the foundation meets the ground and let the grade tell you a story.
Stand back and sight along the wall. Look for stair-step cracks in mortar, bulges, or gaps at window wells—early signs of foundation settlement.
Check the grade slope: soil should fall away from the wall at least 6 inches over 10 feet. If it tilts toward the house, water will pool and push into masonry, worsening cracks and efflorescence.
Probe the base of the wall after rain. Damp, spalling bricks or flaking parging signal chronic moisture.
Note downspouts and splash blocks; discharge should land several feet from the foundation. Clear mulch or debris holding moisture against the wall.
Regrade low spots and seal visible gaps to redirect water now.
Chimneys and Caps
Chimneys reveal water problems fast, so scan from crown to flashing before anything else. Check the concrete crown for cracks, crumbling edges, or ponding water. Hairline fissures let moisture in and freeze-thaw cycles widen them. Confirm the cap installation fits tightly and slopes to shed water; a missing or loose cap invites rain and wildlife. Look at the flue tile for gaps and spalling.
Move down the stack. Inspect bricks and mortar joints for step cracking, efflorescence, and bulging faces. White salts signal chronic moisture.
Examine the flashing where chimney meets roof—counterflashing should be tight, with no gaps or lifted edges. Stains on nearby shingles indicate leaks.
As part of chimney maintenance, reseal crowns, repoint weak joints, and repair flashing before interior damage starts.
Interior Signs of Moisture and Movement
Although exterior damage often grabs attention, interior clues can reveal masonry problems sooner and more reliably. Start by scanning walls and ceilings near exterior masonry for damp patches, peeling paint, or tide lines.
Use your nose—musty odors often precede visible staining. Check baseboards and window returns for soft spots, efflorescence, or bubbling finishes. Look inside closets on exterior walls, where humidity lingers and interior mold can take hold.
Track patterns over time with simple moisture mapping: note dates, locations, and weather to see if leaks coincide with storms or thaw cycles.
Monitor doors and windows that begin sticking or drifting out of square; that subtle movement can signal shifting masonry. In basements, inspect sill plates, beam pockets, and mortar joints for darkening, salt deposits, or crumbly sections.
Understanding Common Crack Types
While every crack isn’t a structural emergency, its pattern, width, and location tell you what’s happening in the masonry. Start by mapping crack patterns: vertical, horizontal, diagonal, and random hairlines each suggest different forces.
Vertical cracks near mid‑span often relate to shrinkage or minor settlement. Horizontal cracks near grade can indicate soil pressure or corrosion of embedded steel. Diagonal cracks radiating from window or door corners usually reflect stress concentrations.
Measure width. Hairline (under 1/16 inch) often points to drying or thermal movement in masonry materials. Wider, uneven gaps can mean ongoing movement.
Note continuity: a crack crossing multiple units and mortar joints typically signals structural action, while a mortar‑only crack may be bond or weathering related. Track change with dated photos and feeler gauges to judge activity.
Reading Stair-Step Cracks in Brick and Block
Stair-step cracks trace along mortar joints in a zigzag, and they’re your clearest clue to movement in the foundation or support below. You’re reading a pattern, not a single line.
Begin your stair step interpretation by noting where the crack starts and ends—near corners, openings, or grade changes. Check brick alignment along the crack; offset bricks or rotated blocks suggest settlement or lateral pressure. Measure width: hairline cracks that stay uniform often reflect minor movement, while wider segments or abrupt changes indicate ongoing displacement.
Note crack start/end, alignment shifts, and width changes to distinguish minor movement from ongoing displacement.
Look for vertical displacement between treads of the “stair.” A ledge you can feel with a fingertip points to differential settlement. Track moisture entry at the joints, staining, or softened mortar.
Finally, monitor change: mark endpoints, record widths, and recheck after seasonal cycles.
Identifying Efflorescence and What It Signals
Even if the wall looks dusty, don’t brush it off—those white, powdery blooms are efflorescence, salt deposits left behind as water migrates through masonry and evaporates. You’re seeing a moisture pathway. Efflorescence causes include rain or plumbing leaks, vapor moving from damp soil, and soluble salts in mortar, brick, or block. Check shaded or newly built areas; fresh work often shows it first.
| Indicator | What It Signals |
| Uniform white film | Widespread moisture movement |
| Crusty, localized patches | Point-source leak or splashback |
| Reappears after cleaning | Ongoing water entry |
Efflorescence prevention focuses on controlling water: repair flashing and seal penetrations, improve grading and drainage, and keep gutters clear. Let suspect areas dry before gentle dry brushing; avoid aggressive washing that drives moisture deeper. If it returns, investigate the moisture source immediately.
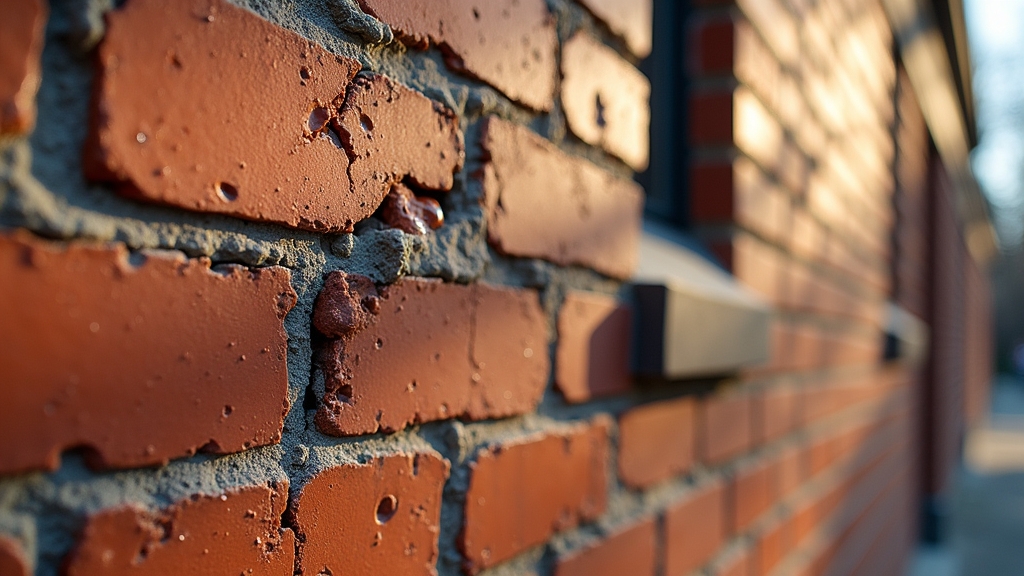
Spotting Spalling, Flaking, and Surface Scaling
You’ll spot spalled bricks by their broken faces, shallow pits, and edges that flake or shear off.
Check if the damage localizes near mortar joints, sills, or grade lines—typical stress and moisture zones.
Understand that surface scaling often comes from freeze-thaw cycles, trapped moisture behind sealers, deicing salts, or hard, incompatible mortar.
Identifying Spalled Bricks
Flakes, pits, and shallow craters on a brick’s face are the telltale signs of spalling. When you see these, you’re looking at spalled bricks, not simple dirt or aging. Run your fingers across the surface; if it feels gritty and sheds chips, the outer layer has detached.
Check multiple bricks—spalling often clusters, especially near grade lines, steps, and window sills.
- Inspect corners and edges: sharp corners round off first, revealing early spalling.
- Look for color shifts: pale, chalky patches signal lost surface density.
- Tap lightly with a screwdriver handle: a dull thud suggests a delaminated skin.
- Probe mortar joints: crumbling joints beside flaked faces indicate broader deterioration.
Document locations and severity.
Plan targeted brick replacement where faces have failed, prioritizing stability and uniform appearance.
Causes of Surface Scaling
Although scaling looks like simple wear, it usually stems from moisture and freeze–thaw stress. When water infiltrates brick, block, or concrete, it saturates pores. As temperatures drop, trapped water freezes, expands, and forces the outer face to flake. Repeated cycles accelerate surface deterioration, turning thin flakes into broader sheets.
Deicing salts worsen the problem by drawing in more moisture and disrupting cement paste. Acidic cleaners and pressure-washing can abrade the surface, opening pathways for water. Poor curing, weak mix designs, or low air-entrainment make concrete especially vulnerable.
Environmental factors matter, too: wind-driven rain, roof runoff, and shaded areas that dry slowly keep masonry wet longer. Finally, impermeable coatings can trap moisture.
You’ll limit scaling by improving drainage, sealing judiciously, and controlling salt exposure.
Tracking Damp Patches, Stains, and Musty Odors
When damp patches, stains, or musty odors appear, treat them as clues and map them before they spread. Start by sketching the wall and floor areas, then note size, color, and time of day you notice changes.
Use simple damp detection techniques—paper towels, blue painter’s tape for edges, a hygrometer, and a basic moisture meter—to verify patterns. Pair those with odor identification methods: is the smell earthy (mold), sour (bacterial), or chemical (cleaners reacting with moisture)?
- Mark patch boundaries daily; photograph with a ruler for scale.
- Record humidity and temperature alongside moisture readings.
- Track stain color shifts—white crust suggests salts; brown often indicates organic matter.
- Compare odor intensity after ventilation versus closed-up periods to pinpoint active zones.
How Water Gets In: Drainage, Grading, and Sealants
Even the soundest masonry leaks if water is guided toward it, not away from it.
Start by watching how rain moves across your site. If water pools near walls or the foundation, you need better grading techniques: create a steady slope that directs runoff at least several feet from the structure. Check downspouts and gutters; if they dump water at the base, extend them or add splash blocks as simple drainage solutions.
Next, inspect joints, penetrations, and caps. Mortar gaps, failed caulk around utility lines, and cracked chimney crowns let water in.
Use compatible sealants to close small gaps, and repoint deteriorated mortar with the right mix. Sealers can help, but only after you fix slope and flow.
Prioritize redirecting water first; sealing without drainage invites trouble.
Freeze-Thaw Cycles and Their Impact on Masonry
If water lingers in masonry, freezing turns it into a wedge that pries pores and cracks wider with each cycle. You’re looking for the subtle signs of masonry deterioration that start small and accelerate in cold climates.
As ice expands about 9%, repeated freeze-thaw cycles stress mortar and units, spalling faces and loosening joints. Focus on materials and details that boost freeze thaw resistance, and note patterns that point to moisture pathways.
- Inspect shaded walls and parapets where melting is slow; look for flaking, granular surfaces, and popped faces.
- Probe mortar with a pick; soft, sandy joints signal repeated cycling damage.
- Check caps, sills, and ledges for hairline cracks channeling water inward.
- Compare north vs. south elevations; colder sides often show earlier deterioration.
Documenting Findings and Monitoring Changes Over Time
Blueprints aren’t enough—you need a clear record of what you saw, where, and when. Create a simple log: date, location (wall, course, joint), condition, and weather. Use consistent terms—hairline, step crack, efflorescence, damp stain.
Add photos from the same angles each time, including a ruler or coin for scale. Mark cracks with a pencil tick at each end and note measurements.
Prioritize recording observations that quantify movement: width, length, and any spalled units. Map issues on a sketch so patterns stand out.
Set a schedule for tracking changes—weekly after heavy rain or freeze-thaw swings, monthly in stable seasons. Compare photos side by side and update measurements. Small, steady growth matters.
Store everything in one folder so your history is complete and accessible.
When to Call a Professional and What to Expect
You should call a pro when you see rapid crack growth, bulging walls, loose bricks, leaning chimneys, or recurring moisture.
Choose a qualified mason or structural engineer with relevant licenses, references, and experience matching your issue.
Expect an assessment visit, a written scope with costs, and a repair timeline that factors weather, access, and material lead times.
Red Flags to Escalate
Suddenly notice a crack widening, a bulge in a wall, or bricks shifting out of line? Those are warning signs to escalate.
Call a pro when you see rapid changes, movement, or moisture that keeps returning. Safety and structural stability can’t wait; the escalation process helps contain damage and costs.
- Rapid crack growth: If a crack lengthens or opens within weeks, stop DIY monitoring and request an urgent assessment.
- Displacement or leaning: Bulging masonry, tilting chimneys, or lintels sagging indicate load issues that need immediate evaluation.
- Persistent moisture: Reappearing efflorescence, damp odors, or spalling after repairs point to hidden leaks and trapped water.
- Crumbling joints or loose bricks: Widespread mortar loss or hollow-sounding units suggest deeper deterioration requiring professional inspection and a prioritized repair plan.
Choosing the Right Specialist
Escalation signs point to one next step: bring in the right pro and know what the visit entails.
Call a professional when cracks widen, moisture persists, bricks spall, or movement affects doors, windows, or chimneys. Choose a contractor with specialist qualifications: licensed, insured, and experienced with your masonry materials—brick, block, stone, or terra-cotta.
Ask for certifications (e.g., from masonry or historic preservation groups), recent project photos, and references. Verify they use compatible mortars and vapor-permeable sealers.
Expect an on-site assessment: visual survey, moisture readings, mortar probing, and photos. The pro should explain causes, risks, and repair options, prioritizing safety and water control.
You’ll receive a written scope, materials list, and itemized estimate. Avoid pressure sales, vague bids, and anyone dismissing drainage or structural concerns.
Inspection and Repair Timeline
When minor hairline cracks appear or white salt deposits keep returning, mark the calendar and start a simple checklist so small issues don’t become structural repairs.
Set an inspection frequency: quick walkarounds monthly, detailed reviews each spring and fall, and after severe storms.
Call a professional when cracks widen beyond 1/8 inch, stair-step patterns spread, doors stick, or interior damp spots persist.
Expect a visual survey, moisture readings, and a written scope outlining repair methods, timelines, and costs.
- Document: Photograph trouble spots with dates to track movement and moisture.
- Stabilize: Keep gutters clear and grade soil away while you schedule help.
- Verify: Ask for a moisture map, crack gauges, and warranty terms.
- Plan: Sequence repairs—repointing, sealing, drainage corrections—before cosmetic fixes.
Frequently Asked Questions
How Do Different Mortar Types Affect Crack Behavior and Repairs?
Different mortar types change how cracks start and spread. Softer mixes limit crack propagation and protect masonry; harder mortars increase stiffness, concentrate stress, and widen fractures. Match mortar strength to unit strength, then choose compatible, flexible repair materials and joint profiles.
Can Historic Masonry Be Inspected Without Violating Preservation Guidelines?
Yes—you can. Use non-invasive inspection techniques aligned with historic preservation standards: visual surveys, telephoto photos, moisture meters, borescopes in joints, drone imaging, and gentle cleaning tests. Document thoroughly, avoid destructive probes, consult preservation specialists, and obtain approvals before sampling.
What Smartphone Apps Help Map and Measure Masonry Cracks Accurately?
Use apps like CrackMap, Fulcrum, MagicPlan, and OpenSpace. You’ll capture photos, automate crack mapping, and improve measurement accuracy with AR rulers, scale calibration, and timestamps. Export annotated reports, track changes over time, and integrate GIS/BIM for preservation documentation.
How Do Nearby Trees and Roots Influence Masonry Moisture and Movement?
Nearby trees influence masonry by drawing water from soils, causing moisture absorption shifts and uneven settlement. You’ll see seasonal movement, cracking, and gaps. Tree root impact also exerts pressure on foundations and drains, redirecting water and amplifying differential movement and dampness.
Are Infrared or Moisture Meters Reliable on Stone Versus Brick Walls?
Yes, but reliability differs. On brick, infrared technology and moisture detection tools map patterns consistently. On stone, variable density and surface textures cause false positives. You’ll validate with multiple readings, baseline comparisons, core sampling, and seasonal monitoring to confirm results.
Final Thoughts
You’ve got the essentials to spot problems early: inspect methodically, document cracks and damp areas, fix drainage first, then repoint and seal. Early action keeps water out, limits freeze–thaw damage, and prevents small defects from turning into structural repairs—protecting both your home and your budget.
If you’re seeing widening cracks, recurring efflorescence, bulging units, or persistent dampness, it’s time for a professional assessment.
At Premiere Masonry Rochester Hills, we specialize in comprehensive inspections, repointing, sealing, drainage corrections, chimney and lintel repairs, and full masonry restoration. We match materials correctly, use breathable assemblies, and back our work with warranties—so your repairs last.
Call Premiere Masonry Rochester Hills or visit our Contact Page to schedule your free consultation today. Safeguard your masonry—and your investment—with trusted local experts.